Description
The Human Light Show is a personal and interactive piece that uses LED lights
to showcase the body shape and movement within a dark space. The LEDs will be meticulously attached to a zip up hoodie and a pair of pants. An individual wearing these articles of clothing will be able to control the LED lights with a remote control by simply pressing a number to turn on individual colors that also involve transitions such as fading in and out. An audience member or project cohort using the remote control can be in charge of changing the lights while another individual is wearing the prototype. Dancing or arbitrary movements is highly recommended to enhance the experience for not only the individual wearing the clothing, but also the audience members as well.
Inspiration for this concept came from a dance artist group named Wrecking Crew
Orchestra, as well as previous projects such the Creative Switch Project (Darmawan’s hat) and Wearable/Interactive Project (Jeff’s zip up hoodie). An opportunity arises to create long exposure images that in itself creates different photographic compositions. Moreover, this can also bring back the ongoing discussion of whether we consider
ourselves cyborgs.

Parts / Materials List
- 1 IR Remote
- 1 IR Receiver
- 28 Red LEDs
- 28 Yellow LEDs
- 28 White LEDs
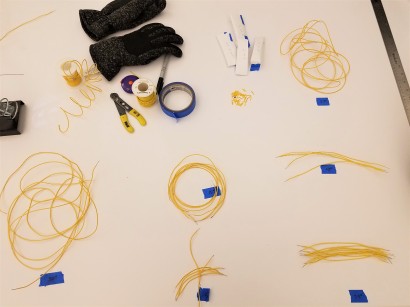
- Electrical Wire
- Solder
- Soldering Iron
- 1 Zip Up Hoodie
- 1 Pair of Paints
- 1 Arduino UNO
- 14 100 Ohm Resistors
- 14 10 Ohm Resistors
- Electrical Tape
- Duct Tape
- 3 Transistors
- Measuring Tape
- Wire Cutters
- Wire Strippers
- 9V 2000mA Adapter
Assembly
- With Current Limiting Resistor Calculations conducted, we know we need to test a total of 28 RED LEDs, 28 YELLOW LEDs, and 28 WHITE LEDs to make sure each one works before all parallel circuits are made.


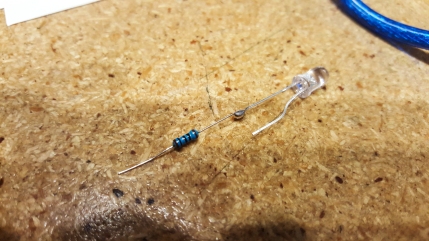
- Take seven 10 Ohm Resistors and solder them individually to the negative leg of five separate RED LEDs.
- Take seven 10 Ohm Resistors and solder them individually to the negative leg of five separate YELLOW LEDs.
- Take fourteen 100 Ohm Resistors and solder them individually to the negative leg of ten separate WHITE LEDs.
- Take the measuring tape and determine the locations of the LEDs evenly throughout both the zip up hoodie and pants. Pinpoint locations by using tape and marking the them with a “X.”


- After retrieving the measurements from one point to another, start cutting electrical wire at least 2 inches longer than exact distances to compensate for movement.
- We will do one LED color at a time so choose either RED or YELLOW for the meantime (Process for RED and YELLOW LEDs are similar besides connection on Arduino). Start soldering the respective electrical wire to the other end of the LEDs (positive leg) and attach the alligator clips to the open electrical wires between the jacket and pants by following the diagram below.


- Tape down the wires according to the markers left from STEP 5.

- Solder one transistor to the electrical wires yet to be connected near the ends of the feet. In addition, solder an extra electrical wire to the signal leg of the transistor which will be connected straight to the Arduino. Follow the diagram below.
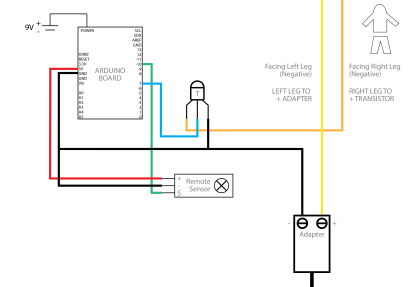
- We will now do our first test to make sure the lights work properly. Upload the code (code is at the below the Assembly list) to the Arduino and make sure electrical wire is in the correct pins, that the Adapter is connected correctly, and the IR Receiver is in the correct location on the breadboard. Don’t forget to plug in the 9V Battery to the Arduino! Follow the same diagram from STEP 9 for the rest of the setup.


- You can now repeat STEPs 7-10 for the LED color that wasn’t assembled yet (RED or YELLOW LEDs). Reminder to test the LEDs before moving onto the next color.
- For the WHITE LEDs, assembly is a little different. Circuit setup can be followed by the diagram below. Make sure to cut electrical wire that suits the setup as well.


- Using duct tape, tape down the LEDs, the rest of the electrical wires, the sensor, Ardunio, and 9V battery near the bottom of the right leg.


- Now the assembly should be finished and the zip up hoodie and pants can be tested with all LEDs working properly.


/*
Art 150
Project 4
Darmawan Truong, Gabe Mui, Jeff Torres
LED Suit
*/

#include <IRremote.h>

//Pins for LEDs and remote input
int RECV_PIN = 7;
int LED1 = 10;
int LED2 = 9;
int LED3 = 6;
//button counters to switch between "on" and "off"
int b0 = 0;
int b1 = 0;
int b2 = 0;
int b3 = 0;
int b4 = 0;
int b5 = 0;
int b6 = 0;
int b7 = 0;
int b8 = 0;
int b9 = 0;
int brightness = 0;    // how bright the LED is
int fadeAmount = 5;    // how many points to fade the LED by
IRrecv irrecv(RECV_PIN);

decode_results results;

void setup()
{
Serial.begin(9600);
// In case the interrupt driver crashes on setup, give a clue
// to the user what’s going on.
Serial.println("Enabling IRin");
irrecv.enableIRIn(); // Start the receiver
Serial.println("Enabled IRin");
pinMode(LED1, OUTPUT);
pinMode(LED2, OUTPUT);
pinMode(LED3, OUTPUT);
}

void loop() {
if (irrecv.decode(&results)) {
  Serial.println(results.value, DEC);
  switch(results.value){

  //button 1
  case 16724175: //values from your remote buttons
    if (b1>=1){
      digitalWrite(LED1, LOW);
      b1=0;
      }
    else{
      digitalWrite(LED1, HIGH);
      b1++;
    }
  break;

  //button 2
  case 16718055: //value from your remote buttons
    if (b2>=1){
      digitalWrite(LED2, LOW);
      b2=0;
      }
    else{
      digitalWrite(LED2, HIGH);
      b2++;
    }
  break;

  //button 3
  case 16743045:
    if (b3>=1){
      digitalWrite(LED3, LOW);
      b3=0;
      }
    else{
      digitalWrite(LED3, HIGH);
      b3++;
    }
  break;

  //button 4
  case 16716015:
  if(b4>1){
      b4++;
    }
  else{
    b4 = 0;

    for(int i=0;i<500;i++){
        // set the brightness of pin 10 :
      analogWrite(LED1, brightness);

      // change the brightness for next time through the loop:
      brightness = brightness + fadeAmount;

      // reverse the direction of the fading at the ends of the fade:
      if (brightness <= 0 || brightness >= 255) {
        fadeAmount = -fadeAmount;
      }
      // wait for 5 milliseconds to see the dimming effect
      delay(5);
      }
    }
  break;

  //button 5
  case 16726215:
  if(b5>1){
      b5++;
    }
  else{
    b5 = 0;
    for(int i=0;i<500;i++){
        // set the brightness of pin 10 :
      analogWrite(LED2, brightness);

      // change the brightness for next time through the loop:
      brightness = brightness + fadeAmount;

      // reverse the direction of the fading at the ends of the fade:
      if (brightness <= 0 || brightness >= 255) {
        fadeAmount = -fadeAmount;
      }
      // wait for 5 milliseconds to see the dimming effect
      delay(5);
      }
    }
  break;

  //button 6
  case 16734885:
  if(b6>1){
      b6++;
    }
  else{
    b6 = 0;
    for(int i=0;i<500;i++){

        // set the brightness of pin 10 :
      analogWrite(LED3, brightness);

      // change the brightness for next time through the loop:
      brightness = brightness + fadeAmount;

      // reverse the direction of the fading at the ends of the fade:
      if (brightness <= 0 || brightness >= 255) {
        fadeAmount = -fadeAmount;
      }
      // wait for 5 milliseconds to see the dimming effect
      delay(5);
      }
    }
  break;

  //button 7
  case 16728765:
    for(int i = 0; i<5; i++){
      digitalWrite(LED1, HIGH);
      digitalWrite(LED2, HIGH);
      digitalWrite(LED3, HIGH);
      delay(300);
      digitalWrite(LED3, LOW);
      digitalWrite(LED2, LOW);
      digitalWrite(LED1, LOW);
      delay(300);
    }
  break;

  //button 8
  case 16730805:
    for(int i = 0; i<3; i++){
      digitalWrite(LED1, HIGH);
      delay(100);
      digitalWrite(LED2, HIGH);
      delay(100);
      digitalWrite(LED3, HIGH);
      delay(100);
      digitalWrite(LED3, LOW);
      delay(300);
      digitalWrite(LED2, LOW);
      delay(300);
      digitalWrite(LED1, LOW);
      delay(300);
    }
  break;

  //button 9
  case 16732845:

  for(int i = 0; i<3; i++){
      digitalWrite(LED1, HIGH);
      delay(100);
      digitalWrite(LED2, HIGH);
      delay(100);
      digitalWrite(LED3, HIGH);
      delay(100);
      digitalWrite(LED1, LOW);
      delay(200);
      digitalWrite(LED2, LOW);
      delay(200);
      digitalWrite(LED3, LOW);
      delay(200);
    }
  break;

  //button 0
  case 16738455:

  break;

  }
  irrecv.resume(); // Receive the next value
  }

  //delay(100);
}


